The Register Sequence
Hands-on to implement a simple UVM ambient with RAL
Where the magic happens
Okay, we have our register model, our DUT, our UVM components that aren't affected by RAL. The only thing that isn't clear yet is where the magic happens. The following sections will reveal the secrets behind the write() and read() functions, and why they are so powerful.
write()
This function will basically write a given value to the register bank in DUT. It will receive two parameters:
uvm_status_e status; // The output of the function is the status
regmodel.ct_life_reg.write(.status(status), .value(8'hFD));
The following function will write the valu 8'hFD into the register in DUT. You may be asking: "How this will be done if we are not passing any address or write command?". In order to answer this question, let's see what happens when we call write():
The first thing that will happen is the creation of an
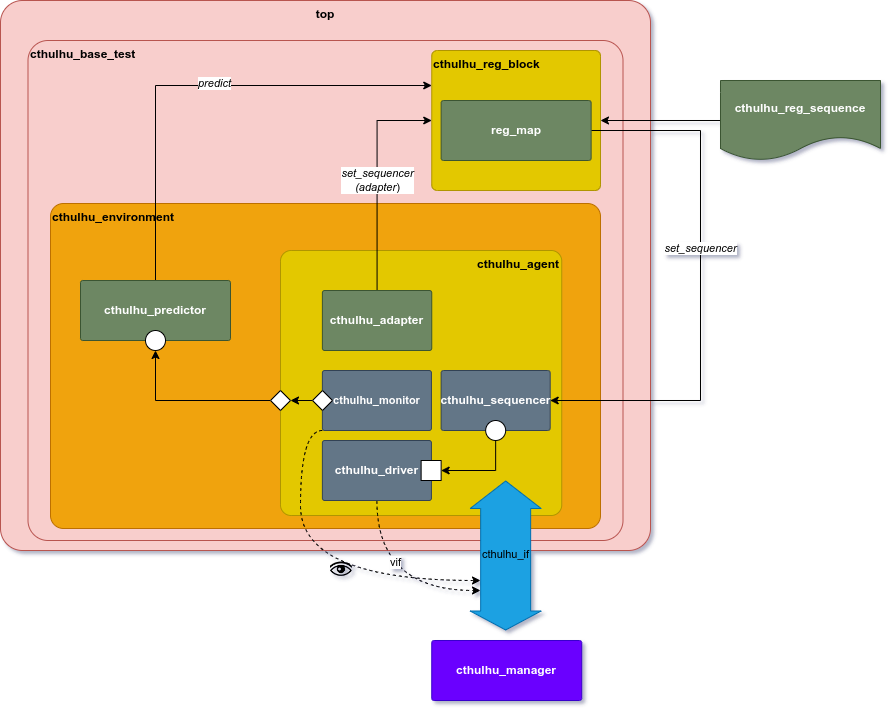
uvm_reg_itemobject. If you remember the implementation ofcthulhu_life_reg, there we specify the fields, the policy access and the size of the register. The address information is stored incthulhu_reg_block;Remember the
cthulhu_adapter? It will convert the write operation to a bus transaction;The driver will then send the transaction by the interface to DUT;
The monitor will capture the bus transaction;
Our explicit predictor will ask our adapter to convert back the bus transaction into a register operation;
This operation will be converted into an
uvm_reg_item;This object will update the registers values in our model.
If RAL wasn't used, we would have to define in our sequence the step by step to perform a write operation, like:
Set
write_ento 1'b1Set
addrto 'h300Set
data_wto 8'hFD
Now we can see one of the advantages of using RAL. Let's go to the read() operation:
read()
This function will read a value from the register bank in DUT. Here, the two parameters are output.
uvm_status_e status;
uvm_reg_data_t incoming_data;
regmodel.ct_status_reg.read(status, incoming_data);
Let's see what the read function does behind the scenes:
Creation of an
uvm_reg_itemobject;The adapter will convert the read operation into a bus transaction;
The driver will send the transaction to DUT;
The monitor will capture the transaction;
The adapter will convert back the bus transaction into register operation;
The
read()returns the read value to the caller (incoming_data);The register operation is converted to a
uvm_reg_item;The register model is updated with the values obtained.
The sequence file
So, our sequence file to this example will be:
class cthulhu_reg_sequence extends uvm_sequence;
	`uvm_object_utils(cthulhu_reg_sequence)

	cthulhu_reg_block regmodel;


	function new(string name = "cthulhu_reg_sequence");
		super.new(name);
	endfunction

	task body;
		uvm_status_e   status;
		uvm_reg_data_t incoming;

		if (starting_phase != null)
			starting_phase.raise_objection(this);

		//Write to the Registers
		regmodel.ct_sanity_reg.write(status, 8'F5);
		regmodel.ct_life_reg.write(status, 8'F0);

		//Read from the registers
		regmodel.ct_status_reg.read(status, incoming);

		if (starting_phase != null)
			starting_phase.drop_objection(this);

	endtask: body
endclass : cthulhu_reg_sequence
Here I'm making a sequence that will perform two write operations and then one read operation. It can be changed to any order or how many operations the verifier wants to make.