Register Blocks
Hands-on to implement a simple UVM ambient with RAL
Register Blocks with RAL
Overview
The bank is very simple. It has only three address (three registers), and it can be observed below:
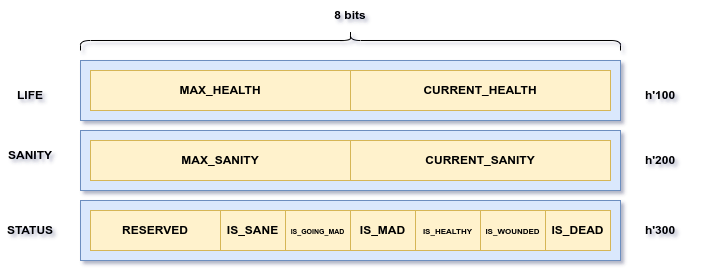
Where each value is described in following tables:
To LIFE register:
| Field | Position | Description | Access |
|---|---|---|---|
| MAX_HEALTH | [7:4] | Max Health points to Player | WO |
| CURRENT_HEALTH | [3:0] | Current Health points of Player | WO |
To SANITY register:
| Field | Position | Description | Access |
|---|---|---|---|
| MAX_SANITY | [7:4] | Max sanity points to Player | WO |
| CURRENT_SANITY | [3:0] | Current sanity points of Player | WO |
To STATUS register:
| Field | Position | Description | Access |
|---|---|---|---|
| RESERVED | [7:6] | Reserved fields | RO |
| IS_SANE | 5 | 1'b1 if CURRENT_SANITY is greather than half of MAX_SANITY | RO |
| ISGOINGMAD | 4 | 1'b1 if CURRENT_SANITY is lesser than half of MAX_SANITY | RO |
| IS_SANE | 3 | 1'b1 if CURRENT_SANITY is zero | RO |
| IS_HEALTHY | 2 | 1'b1 if CURRENT_HEALTH is greather than half of MAX_HEALTH | RO |
| IS_WOUNDED | 1 | 1'b1 if CURRENT_HEALTH is lesser than half of MAX_HEALTH | RO |
| IS_DEAD | 0 | 1'b1 if CURRENT_HEALTH is zero | RO |
Okay, so now we can start talking about modeling these registes with RAL. But before, let's take a look in our ambient:
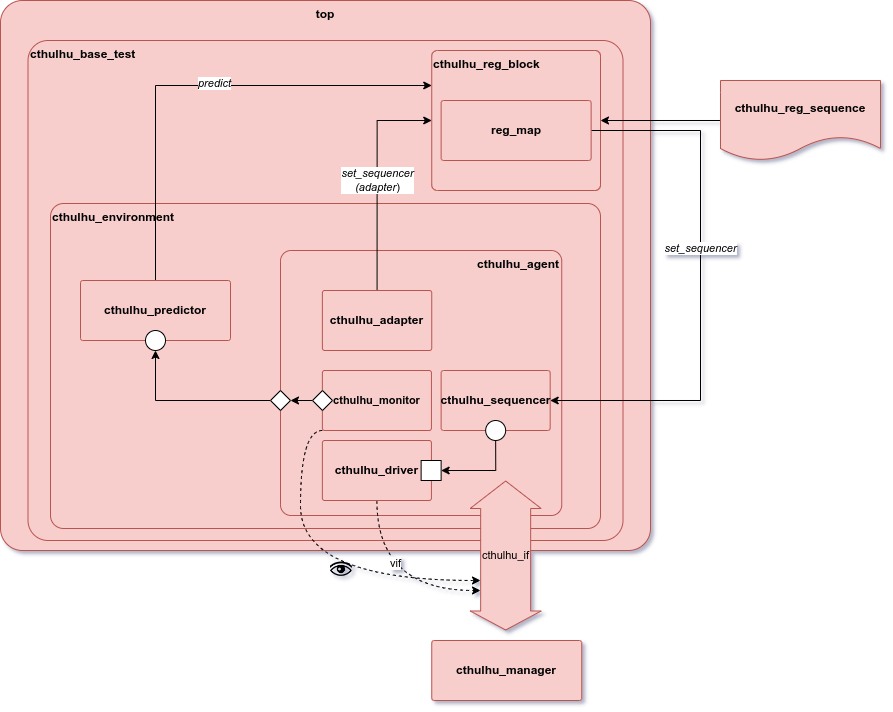
Everything is red because we didn't implement any component, so let's start coloring this diagram.
You don't need to start the entire ambient with RAL components, in this case I'm doing this because the main goal of this Hands-on is to guide you into insert RAL in your ambient, explaining how each component works. The more general components won't be detailed, but the complete code will be shown somewhere in the hands-on.
Register_fields
Fields are used to represent contiguous bit sequences. One single register can contain more than one field, and each one have your particular access policy.
In SystemVerilog, we declare a field using the keyword uvm_reg_field. so, let's start modeling our register bank declaring the respective fields. This will be done in a register file, that will be explained in the following sections. I'm gonna show how it is done to the LIFE register, and you can implement to the other registers following the same logic. The complete code will be available at Source Code page.
class cthulhu_life_reg extends uvm_reg;
	`uvm_object_utils(cthulhu_life_reg)

	//***************************************
	//* Field instantiation                 *
	//***************************************
	rand uvm_reg_field current_health;
	rand uvm_reg_field max_health;

    ...
The rest you will discover in the next section, and it is now!
Register
A register is basically a group of fields in a same address in a given memory map. Taking our example, we have three registers. Each one will be modeled in a class that will extend the uvm_reg class from UVM. At this class, first we declare the fields (Already done), then we define the constructor of the class. The super.new() will receive some parameters, as show below:
function new (string name = "cthulhu_life_reg");
	super.new(.name(name), .n_bits(8), .has_coverage(UVM_NO_COVERAGE));
endfunction
The first parameter doesn't need explanation, it is just the name associated to the object. The second parameter (n_bits) will tell the size of that register in bits, and the last parameter (has_coverage) will tell if this register will be mapped to a coverage.
Now that we have declared our fields and defined the Constructor of our register, let's configure the fields using the following function:
Do not think that this
build()is related to thebuild_phase()function ofuvm_component. Theuvm_regis not anuvm_component, it is anuvm_object(A parent class ofuvm_component, so it doesn't have the methods of child).
virtual function void build();

    // Creation of the field
    max_health = uvm_reg_field::type_id::create("max_health");

    // Configuration of the field
    max_health.configure(.parent(this), // Parent of the field
                        .size(4), // The size of field is defined here, in bits
                        .lsb_pos(4), // The position of LSB bit of the field
                        .access("WO"),  // Access policy. In this case, it is Write Only
                        .volatile(0),  // Tells if this field can be changed internally
                        .reset(4'hf),  // Defines the reset value of the field
                        .has_reset(1), // Tells if the field resets when a reset is applied
                        .is_rand(1), // Allows field randomization
                        .individually_accessible(0)); // When write() is called, the entire register is written


endfunction : build
At this point, you may have noticed that the process is repetitive and boooring. We are enginneers, and we are programmers. Everything that is repetitive and boring we can transform into code to automatize. Let's automatize the configure write with a little script in julia language.
max_health = ["max_health", "this", "4", "4", "WO", "0", "4'hf", "1", "1", "0"]
current_health = ["current_health", "this", "4", "0", "WO", "0", "0", "1", "1", "0"]

life = [max_health, current_health]

for field in life
    println("```verilog")
    println("$(field[1]).configure(")
    println("   .parent($(field[2])),")
    println("   .size($(field[3])),")
    println("   .lsb_pos($(field[4])),")
    println("   .access($(field[5])),")
    println("   .volatile($(field[6])),")
    println("   .reset($(field[7])),")
    println("   .has_reset($(field[8])),")
    println("   .is_rand($(field[9])),")
    println("   .individually_accessible($(field[10]))")
    println(");")
    println("```")
end
The output will be:
max_health.configure(
   .parent(this),
   .size(4),
   .lsb_pos(4),
   .access(WO),
   .volatile(0),
   .reset(4'hf),
   .has_reset(1),
   .is_rand(1),
   .individually_accessible(0)
);current_health.configure(
.parent(this),
.size(4),
.lsb_pos(0),
.access(WO),
.volatile(0),
.reset(0),
.has_reset(1),
.is_rand(1),
.individually_accessible(0)
);Note that with these lines we just have to write the values of each field, run a loop and the program writes the file to us :D. The inputs can came from a csv file, by example, and all register can be written this way.
Now, we have our first file. The cthulhu_life_reg.sv
Register Block
A Register block is a major module that will encapsulate the registers of a given DUT. Each register class created until here will be instantiated inside the Register Block class. This class can also be called Register Package. The steps to create a register block are described below:
Extends
uvm_reg_blockInstantiates registers
Instantiates memory map
Create constructor
Build registers
Build memory map associting each register to a given address
Let's go step by step. First, let's instantiate all register and the memory map
class cthulhu_reg_block extends uvm_reg_block;
    `uvm_object_utils(cthulhu_reg_block)

    //***************************************
    //* Register instantiation              *
    //***************************************

    cthulhu_life_reg ct_life_reg;
    cthulhu_sanity_reg ct_sanity_reg;
    cthulhu_status_reg ct_status_reg;

    uvm_reg_map reg_map;

    ...
Now, the next steps will be creating the constructor and then building the registers. It is very simple to do this:
virtual function void build();

    // Creation, build and configuration
    ct_life_reg = cthulhu_life_reg::type_id::create("ct_life_reg");
    ct_life_reg.build();
    ct_life_reg.configure(this);

    ct_sanity_reg = cthulhu_sanity_reg::type_id::create("ct_sanity_reg");
    ct_sanity_reg.build();
    ct_sanity_reg.configure(this);

    ct_status_reg = cthulhu_status_reg::type_id::create("ct_status_reg");
    ct_status_reg.build();
    ct_status_reg.configure(this);
We are almost finishing the Register modeling part of RAL. The last thing we must do is build the memory map. We will use the function create_map() to create the memory map. Then, we will use the function add_reg() to add each register. Then, the lock_model() will finish the map addressing.
// Map creation
    reg_map.create_map(
        .name("reg_map"), // Just the name bro
        .base_addr(12'h100), // The base address of memory map '
        .n_bytes(1), // The number of bytes of each register
        .endian(UVM_LITTLE_ENDIAN) // Defines order of storage values in fields
    );

    // Adding Registers
    reg_map.add_reg(
        .rg(ct_life_reg), //Register instance
        .offset('h000),   //Address offset '
        .rights("WO")     //Access Policy
    );

    reg_map.add_reg(
        .rg(ct_sanity_reg),
        .offset('h100),
        .rights("WO")
    );

    reg_map.add_reg(
        .rg(ct_status_reg),
        .offset('h200),
        .rights("RO")
    );

    lock_model();

endfunction : build
And now, we have our first component written, the UVM diagram now is:
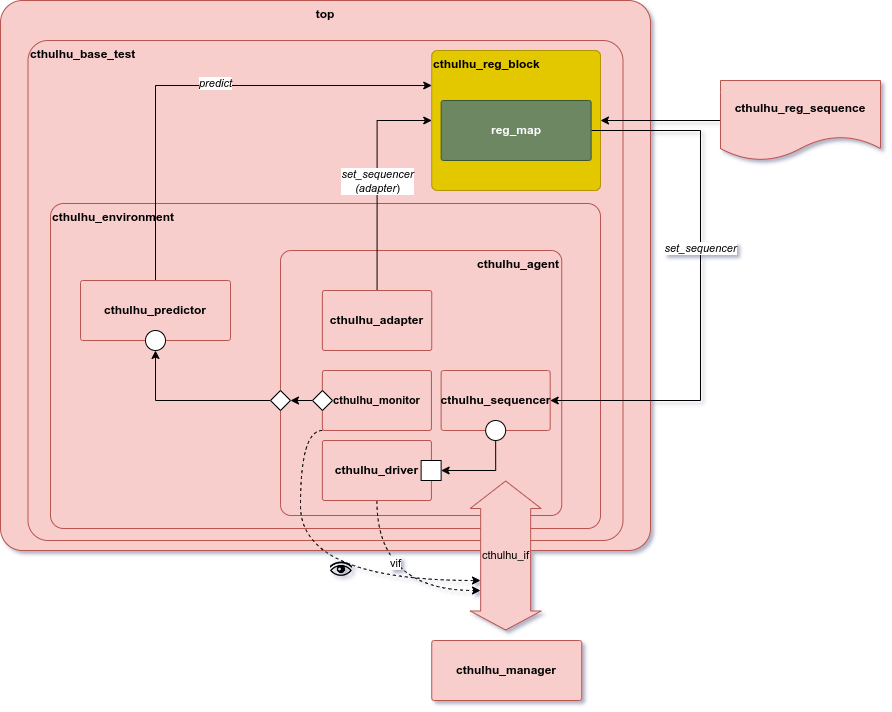
In the next section, we will se what is the adapter and how it works.